Construction - 6x8 Hut - Hi Hat Gables
Tools
|
Materials
|
Techniques
|
Instructions
The hi-hat gables are the most unusual panels in the entire Mad Housers inventory. They're not square, or even triangular. The studs are not attached to each other; instead, they're mounted flat directly to the plywood and attached using screws. Furthermore, there is an intentional gap at the top of the panel where the roof panel's 'lock stud' slides into place during installation. For all its strangeness, however, the gables are actually simple to construct, as long as you're comfortable making diagonal cuts with a circular saw.
Cutting the plywood
- Start with a single rectangular piece of 3/8" plywood, 72"x48". Use a chalk line to snap a diagonal.
- Cut the plywood into two right triangles, 48" high with a 72" base
- Measuring carefully along the hypotenuse from the bottom (narrow) angle of the triangle, mark 82 7/8" inches from the bottom. Use a carpenter's square to mark a line at a right angle to the hypotenuse from that mark. If your cuts are straight, the line will intersect the upright side of your right triangle at 41" and be about 5 1/2" long. It's OK if it's a little off, however
- Cut along the new line. This nips off a small triangle, and you may wonder why we bother. The reason is that when we used a straight 'shed' roof, rain would wick in between the underside of the top sheet of plywood and the stud of the roof panel, leaking right in the middle of the structure. Nipping off the top triangle means that the plywood is facing downwards from the rain at all points.
Cut the studs
- Cut one stud normally at 41"
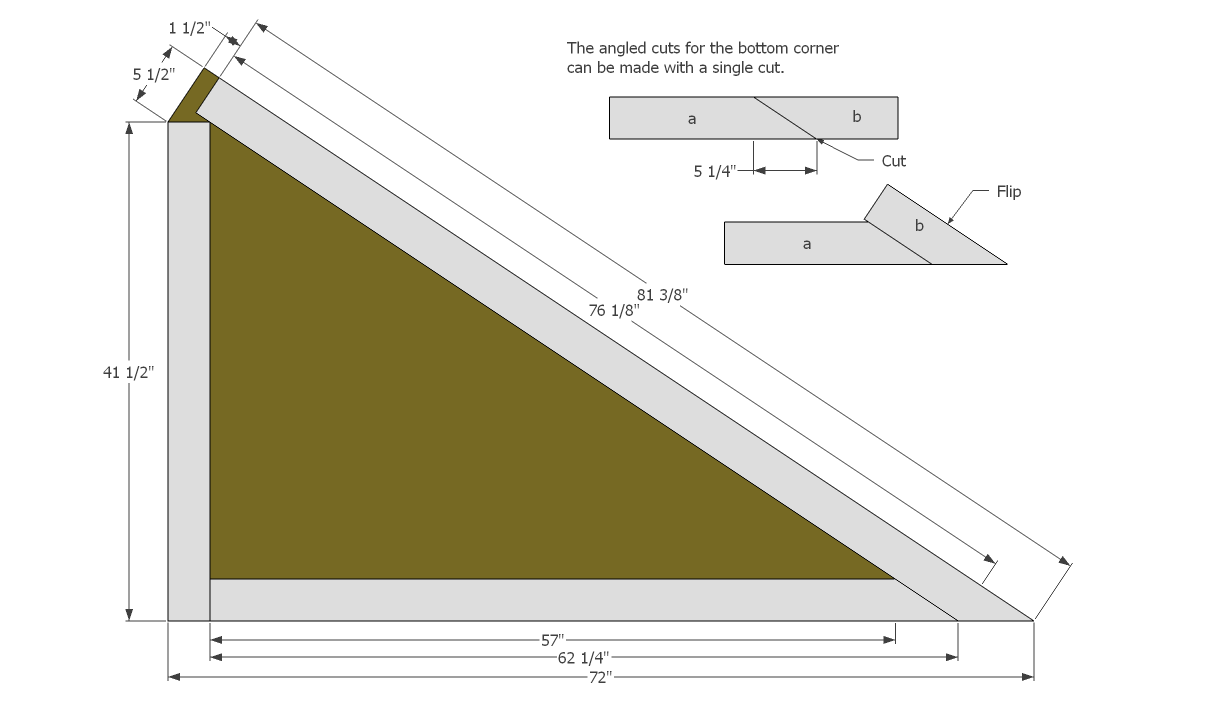
- Take a long (at least 84") stud. Laying the stud flat, mark 76 1/8" on one side of the stud and 81 3/8" on the other. Mark a line between the two points.
- Cut along the line. If you're planning to use scrap to build out the bottom stud (which is what we do), then hang onto the trimmed piece from the angle cut to fill in the bottom corner (see diagram).
- If you want a whole piece of stud for the bottom, take another 2x4 that's at least 63 inches, mark at 57" and 62 1/4", mark a line and cut.
Manufacture the panels
It's very important that the studs are screwed to the plywood instead of nailed on - otherwise, the stud will simply pop off of the panel the first time the panel is flexed.
This is most easily done by laying the plywood on the floor and tucking the stud underneath it.
- Screw the 41.5" upright onto the plywood.
- Carefully making sure that the angle corner of the stud matches flush against the corner of the plywood, screw in the hypotenuse stud. The flat end of the stud should not come all the way up against the plywood. Instead, there should be a 1.5" gap between the end of the stud and the end of the plywood (see diagram).
- Screw in the bottom stud(s). This piece can be filled in with the cut from the hypotenuse stud and whatever scrap you have laying around; it's not important that it be a single piece.
Notes
It's very important to remember that the two gables are mirror images of each other! Don't make 'two left feet'. It's easiest to simply make both gables at the same time, laid out on the ground in mirror images of each other, to prevent mistakes.